


I am running VMWare’s free vSphere Hypervisor (formerly known as ESXi) on my Mid-2011 Mac Mini Server (Macmini5,3) for many years . Earlier this year VMWare introduced vSphere Hypervisor 6.7 but as it was not really clear what it would add and I had a stable environment I decided not to upgrade (yet) when it came out.
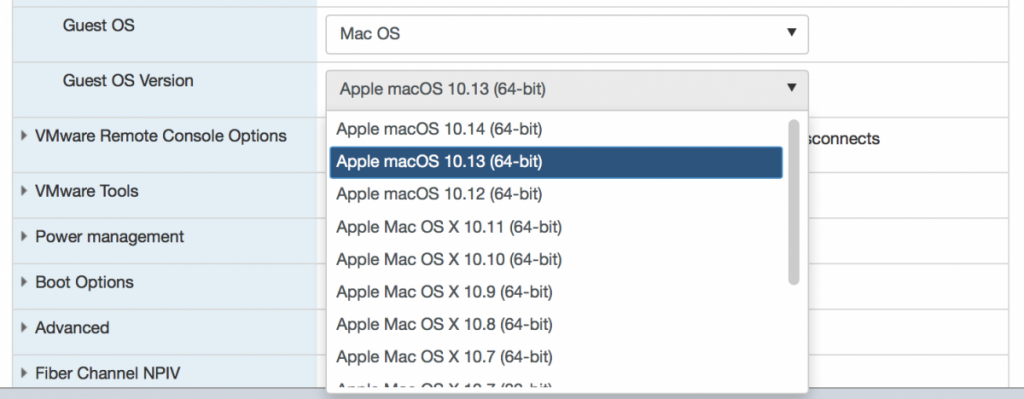
However, ever since Apple introduced the APFS filesystem with MacOS High Sierra, special care was required to install (or upgrade) a MacOS VM on vSphere Hypervisor as the built-in EFI boot did not support this. Since I had to create a new MacOS Server today, I decided to give this update a try to see if it would support MacOS High Sierra. Documentation was not very clear on this, but it turned out that with this version of vSphere Hypervisor, MacOS 12.13 (as well as 12.14!) is supported, as this is how the dropdown when creating a new VM now looks like for MacOS:
This post contains the steps to perform an upgrade from vSphere Hypervisor 6.5u1 to 6.7 on my Mid-2011 Mac Mini Server, including the installation of the (not included) VMWare Tools image for MacOS.
Installation / Upgrade of vSphere Hypervisor 6.7
Installation of vSphere Hypervisor 6.7 on a Mac Mini (or any other system) is pretty straightforward:
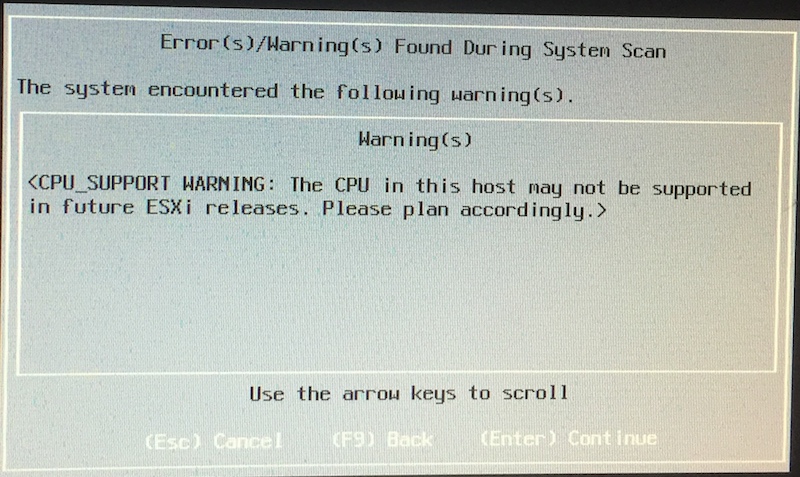
- Check the vSphere Hypervisor 6.7 release notes to ensure there will be no surprises w.r.t. hardware support. Unfortunately (for me) this states that the Intel i7 CPU of my MacMini5.3 is supported in this release but may not be supported in future releases and that I should ‘plan accordingly’.
- Download the vSphere Hypervisor 6.7 ISO image from VMWare’s download page. Please note that this does require an account that you can (must) register for (so your personal information is the price for using this product). On the “Licence & Download” tab you’ll find a download link as well as your personal serial number (which is the same if you already use the 6.X series).
- Create a bootable USB stick from the downloaded ISO image using a tool like UNetbootin (available for Windows, Linux and MacOS) or follow these steps (based on this post) to do it manually on MacOS:
- insert the USB stick in your mac and run this command to see which disk it is:
sudo diskutil listIn my case it became disk2, replace disk2 with the actual device on your mac in the commands below if it is different.
- As MacOS automatically mounts a USB, unmount it (so we can wipe it) with:
diskutil unmountDisk /dev/disk2 - Format the USB Stick with:
diskutil eraseDisk MS-DOS ESXI MBR /dev/disk2 - Next mount the ISO image with:
hdiutil mount ~/Downloads/VMware-VMvisor-Installer-6.7.0-8169922.x86_64.iso - Copy the files from the ISO image to the USB stick with:
cp -R /Volumes/ESXI-6.7.0-8169922-STANDARD/* /Volumes/ESXI - Unmount the ISO image as we no longer need it with:
hdiutil unmount /Volumes/ESXI-6.5.0-20170702001-STANDARD/ - To ensure the USB stick boots correctly we need to check/modify the contents of the file
ISOLINUX.CFG, open it with:vi /Volumes/ESXI/ISOLINUX.CFGand add
-pto lines starting withAPPEND -c boot.cfgso that they read:APPEND -c boot.cfg -p 1to ensure the boot process will work correctly
- Unmount the USB stick with:
diskutil unmountDisk /dev/disk2 - As last step, ensure that the 1st partition on the USB stick is marked active. run the
fdiskcommand with:sudo fdisk -e /dev/disk2and enter the following 3 commands:
f 1wq
To ensure the boot process will start.
- Ensure that before removing the USB stick you eject it with:
diskutil eject /dev/disk2
- insert the USB stick in your mac and run this command to see which disk it is:
- Shutdown the vSphere Hypervisor machine. Recommendation is to enter ‘Maintenance Mode’ first so that no VMs will be started. automatically. Although this is not strictly necessary (I have performed upgrades in the past without), it is a good practice.
- Insert the USB stick and swith on the vSphere Hypervisor machine. On a Mac, hold the ‘Alt’ key to ensure that it will prompt which device to boot from. The USB stick should appear shortly after the internal harddisk(s). Use the mous or keyboard to select it to boot the installer.
- After the boot process I got (as to be expected) a warning that my CPU may not be supported in a future release. I simply pressed ‘Enter’ to continue.
- Follow the screens of the installer to select which disk to upgrade and make sure to specify that an upgrade (and not a clean install) is performed (unless you intend to wipe existing virtual machines) and start the upgrade.
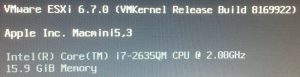
- At the end of the upgrade it will prompt to remove the installation media before restarting. After that my Mid 2011 Mac Mini Server booted the upgraded vSphere Hypervisor 6.7 without problems.
- If you enabled ‘Maintenance Mode’ in step 4, make sure you disable that again and start your VMs.
After these steps I noticed that vSphere Hypervisor allowed me to specify MacOS 12.13 (and even 12.14) as the MacOS version of my VMs, which removed the annoying warning that the OS was not supported. A partial MacOS High Sierra (12.13) installation of a VM could now proceed with its installation (while with vSphere Hypervisor 6.5 it would never boot from the VM) and after the installation completed, I could see that it had been installed with APFS.
All in all a successful upgrade (all VMs started normally) and all current (and the next future) MacOS versions were supported again. However, one task remained, as the vSphere Hypervisor installs ship only with the VMWare Tools for Windows and Linux, the image for MacOS needs to be installed manually.