


for quite some time I have been using FreeIPA to manage 2FA tokens (TOTP, Yubikey, SMS/eMail). As part of my MacOS Server Migration series and moving my OpenDirectory / Authentication services to FreeIPA, I also had to move PrivacyIDEA from my legacy MacOS Server and decided to move it to the FreeIPA server to have all authentication services on the same host. I am aware that FreeIPA also has OTP support built-in, but as that only supports TOTP tokens, this did not suit my needs.
In this post describes how to get this working, without interfering with the FreeIPA web interface/services. This turned out to be a bit tricky as it requires additional rights granted to work under SELinux.
Update 2019-09-18: added how to migrate an existing PrivacyIDEA instance.
The installation of PrivacyIDEA itself is pretty straightforward and well documented step-by-step (which I followed with only minor changes) though the trick was to make things work on a Fedora Core machine with SELinux enabled and to make things play nice with FreeIPA.
Setup dedicated IP address
I decided to add a separate IP address to my FreeIPA server. The FreeIPA server is on a management LAN with private IP addresses so adding one is easy and I would need a separate IP address (or port) anyway later to have both an OTP and non-OTP radius instance (which will be covered in a separate post). This section can be skipped if your FreeIPA server has a static IP address and you don’t need a separate one for PrivacyIDEA.
Setting up a static IP address on a Fedora Core system is easy and well-documented. e.g. here. Similar steps are required to add a secondary IPv4 address. My FreeIPA instance is named like auth.mydomain.tld, I added a token.auth.mydomain.tld to my internal DNS and added it’s (private) IPv4 address with the following steps:
- Open (as root) the device config file (for my
ens192this was/etc/sysconfig/network-scripts/ifcfg-ens192) in an editor - The file should have entries for
IPADDRandPREFIXalready (assuming static IP configuration, which is normal for a server). To add an additional IP adress addIPADDR1andPREFIX1(assuming this is the first secondary address, if these already exist increase as necessary) with the desired values. - Reboot the system or run the following two commands to reload the network configuration:
sudo systemctl restart network.servicesudo systemctl restart NeworkManager.service
Migrating an existing installation
Although the steps below describe an initial (i.e. clean) installation of PrivacyIDEA, they can also be followed to migrate an existing install. In that case, be sure to copy-over your existing keys and database to the new target locations and skip the steps to re-create/initialize them. Where applicable this will be mentioned.
Install and Configure PrivacyIDEA
PrivacyIDEA requires quite a few python packages and is best to run in a Python 3 virtual environment (otherwise all packages need to be installed globally). Make sure that the command virtualenv is installed (and install it if it isn’t) with:
dnf install virtualenvFor an installation of PrivacyIDEA in /opt/privacyidea, run the following command to initialize the environment:
sudo virtualenv /opt/privacyideaNext move to the target directory and install PrivacyIDEA and its dependencies with:
cd /opt/privacyidea
. ./bin/activate
sudo bin/pip install privacyidea
sudo ln -s /opt/privacyidea/etc/privacyidea /etc
As root, create the PrivacyIDEA config file /etc/privacyidea/pi.conf (which is /opt/privacyidea/etc/privacyidea/pi.conf) with the content below. Replace REPLACE_WITH_RANDOM_STRING32/16 with a 32 / 16 character random secret that can be generated on a page like this one, in case you are migrating you need to copy-over your current values for things to continue to work.
# The realm, where users are allowed to login as administrators
SUPERUSER_REALM = ['super', 'administrators']

# Your database
SQLALCHEMY_DATABASE_URI = 'sqlite:////var/db/privacyidea/data.sqlite'

# This is used to encrypt the auth_token
SECRET_KEY = 'REPLACE_WITH_RANDOM_STRING32'
# This is used to encrypt the admin passwords
PI_PEPPER = "REPLACE_WITH_RANDOM_STRING16"
# This is used to encrypt the token data and token passwords
PI_ENCFILE = '/etc/privacyidea/enckey'

# This is used to sign the audit log
PI_AUDIT_KEY_PRIVATE = '/etc/privacyidea/private.pem'
PI_AUDIT_KEY_PUBLIC = '/etc/privacyidea/public.pem'

# PI_AUDIT_MODULE = <python audit module>

# Log configuration
# Log levels: CRITICAL = 50, ERROR = 40, WARNING = 30, INFO = 20, DEBUG = 10
PI_LOGLEVEL = 30
PI_LOGFILE = "/var/log/privacyidea.log"

# PI_INIT_CHECK_HOOK = 'your.module.function'

# PI_UI_DEACTIVATED = True
# PI_CSS = '/location/of/theme.css'
With this config we can initialize PrivacyIDEA in case of a new installation. To have it initialize its encryption and audit keys, database and admin user run:
sudo bin/pi-manage create_enckey
sudo bin/pi-manage create_audit_keys
sudo bin/pi-manage createdb
sudo bin/pi-manage admin add admin -e admin@localhost
The last command will ask for the admin password to be set.
In case of a migration, copy your existing keys to /etc/privacyidea and your existing database to /var/db/privacyidea. Make sure that the filenames match those in the new configuration file (or adjust them there).
After this run the built-in web server as root to check if all is OK with:
sudo bin/pi-manage runserver -h `hostname --fqdn`This step is required to ensure that all files PrivacyIDEA uses exist and have been initialized properly. There should be no errors and the PrivacyIDEA web interface should be available on the FreeIPA server on port 5000. It should be possible to login as admin with the specified password though as the connection does not use SSL better don’t do so unless you can trust the network (please note that in this case you may also have to open up the host-based firewall in this case!).
Stop the running server by pressing CTRL-C and finalize the installation by ‘Stamping’ the database, so that privacyIDEA has the right database schema version and records this for later update processes with this 1-line command:
sudo bin/pi-manage db stamp head -d /opt/privacyidea/lib/privacyidea/migrationsRun as user privacyidea
Since it is a web-based application we don’t want PrivacyIDEA running as root but as user privacyidea. Run the following commands to create the user and group and modify file permissions accordingly:
sudo useradd -r -M -d /opt/privacyidea -s /sbin/nologin privacyidea
sudo chmod 750 /etc/privacyidea/pi.cfg
sudo chgrp privacyidea /etc/privacyidea/pi.cfg
sudo chown /etc/privacyidea/enckey
sudo chown /etc/privacyidea/private.pem
sudo install -d -o privacyidea -g privacyidea -m 0700 /etc/privacyidea/gpg
sudo chmod 750 /var/log/privacyidea.log
sudo chgrp privacyidea /var/log/privacyidea.log
sudo chmod 700 /var/db/privacyidea
sudo chown -R privacyidea:privacyidea /var/db/privacyidea
Grant SELinux rights
Since a FreeIPA Server on Fedora Core has SELinux enabled by default and the Apache httpd is quite restricted on it, PrivacyIDEA won’t run without granting it additional permissions. Despite having access to files based on file permissions, SELinux will deny access to /var/db and /var/log. This will be visible as I/O and permission errors in the log file and more clearly in /var/log/audit/audit.log. The missing permissions can be analyzed using:
sudo fgrep type=AVC /var/log/audit/audit.log | egrep -v "ipasession.key|renew_ca_cert" | audit2whyAs also described in detail here, the remedy of the lack of access can be generated by running:
sudo fgrep type=AVC /var/log/audit/audit.log | egrep -v "ipasession.key|renew_ca_cert" | audit2allow -M privacyideaAs this implies bumping into this first while in production, this is not very useful for an initial installation. Based on using PrivacyIDEA I gathered the necessary access rights for most scenarios and these must be installed for an initial setup. For this, create a file called privacyidea.te with the following contents:
module privacyidea 1.0;

require {
	type httpd_t;
	type var_log_t;
	type system_db_t;
	class file { create open setattr unlink write };
	class dir { add_name remove_name write };
	class process execmem;
}

allow httpd_t self:process execmem;
allow httpd_t system_db_t:dir { add_name remove_name write };
allow httpd_t system_db_t:file { create setattr unlink write };
allow httpd_t var_log_t:file open;
Next run the following three commands to grant these rights:
checkmodule -M -m -o privacyidea.mod privacyidea.te
semodule_package -m privacyidea.mod -o privacyidea.pp
sudo semodule -i privacyidea.pp
In case rights are missing for you setup, use the method described above using audit2why and audit2allow to tweak/refine your ruleset (and please let me know through the comments to include it here)
Configure Apache2
To add PrivacyIDEA to Apache create (as root) the file /etc/httpd/conf.d/privacyidea.conf with the following content (replacing token.auth.mydomain.tld with the DNS name of the virtual host):
# Apache Configuration file for PrivacyIDEA

# Redirect all traffic on port 80 to port 443
<VirtualHost *:80>
  ServerName token.auth.mydomain.tld
  RewriteEngine On
  RewriteCond %{HTTPS} off
  RewriteRule	/	https://%{HTTP_HOST}%{REQUEST_URI}
</VirtualHost>

# Make PrivacyIDEA available on port 443
<VirtualHost *:443>
  ServerName token.auth.mydomain.tld
  # Use separate log files for the PrivacyIDEA virtual host
  ErrorLog logs/privacyidea-errors
  TransferLog logs/privacyidea-access

  # Configure SSL - copied from ssl.conf
  SSLEngine On
  SSLProtocol +TLSv1 +TLSv1.1 +TLSv1.2
  SSLProxyProtocol all -SSLv3
  SSLHonorCipherOrder on
  SSLCipherSuite PROFILE=SYSTEM
  SSLProxyCipherSuite PROFILE=SYSTEM
  SSLCertificateFile /var/lib/ipa/certs/httpd.crt
  SSLCertificateKeyFile /var/lib/ipa/private/httpd.key

  # Reroute Yubikey validation to Yubico-compatible URL
  RewriteEngine on
  RewriteRule	^/wsapi/2.0/verify	/ttype/yubikey	[PT]

  # Configure WSGI for PrivacyIDEA
  WSGIDaemonProcess privacyidea processes=1 threads=10 \
	user=privacyidea group=privacyidea umask=0027 \
	display-name=%{GROUP} python-home=/opt/privacyidea
  WSGIProcessGroup privacyidea
  WSGIPassAuthorization On
  WSGIScriptReloading Off
  WSGIScriptAlias /  \
	/opt/privacyidea/etc/privacyidea/privacyideaapp.wsgi \
	application-group=privacyidea

  # Required for Apache 2.4
  <Directory /opt/privacyidea>
    Require all granted
    Options FollowSymLinks
    AllowOverride None
  </Directory>
</VirtualHost>
Please note that in case you setup a separate IP address for FreeIPA and want to communicate with it directly based on an IP address you should change the VirtualHost opening statements and replace the * in there with that IP address.
Activate the configuration by reloading Apache2 with:
sudo service httpd restartand PrivacyIDA should be available on the configured DNS / server name (redirecting HTTP to HTTPS) and allow you to login as admin with the password specified earlier. First use and further configuration is documented at PrivacyIDEA First Steps and not covered here.
Integrating PrivacyIDEA with FreeIPA
Integrating PrivacyIDEA with FreeIPA as user store for authentication is straightforward as for FreeIPA this is just another LDAP client. Although it is quite straightforward to setup a host and service account in FreeIPA, giving it a simple password allowing it to do a simple (i.e. non-Kerberos) bind requires a direct change to the LDAP database. As also mentioned in an earlier post the script freeipa-service-password.sh (available from my GitLab repository) can be used to set this up with:
./freeipa-service-password.sh `hostname -f` privacyideaThis will create a service under the host in FreeIPA (if it does not exists), (re)sets its LDAP password to a long generated random password and prints out the bind DN and password.
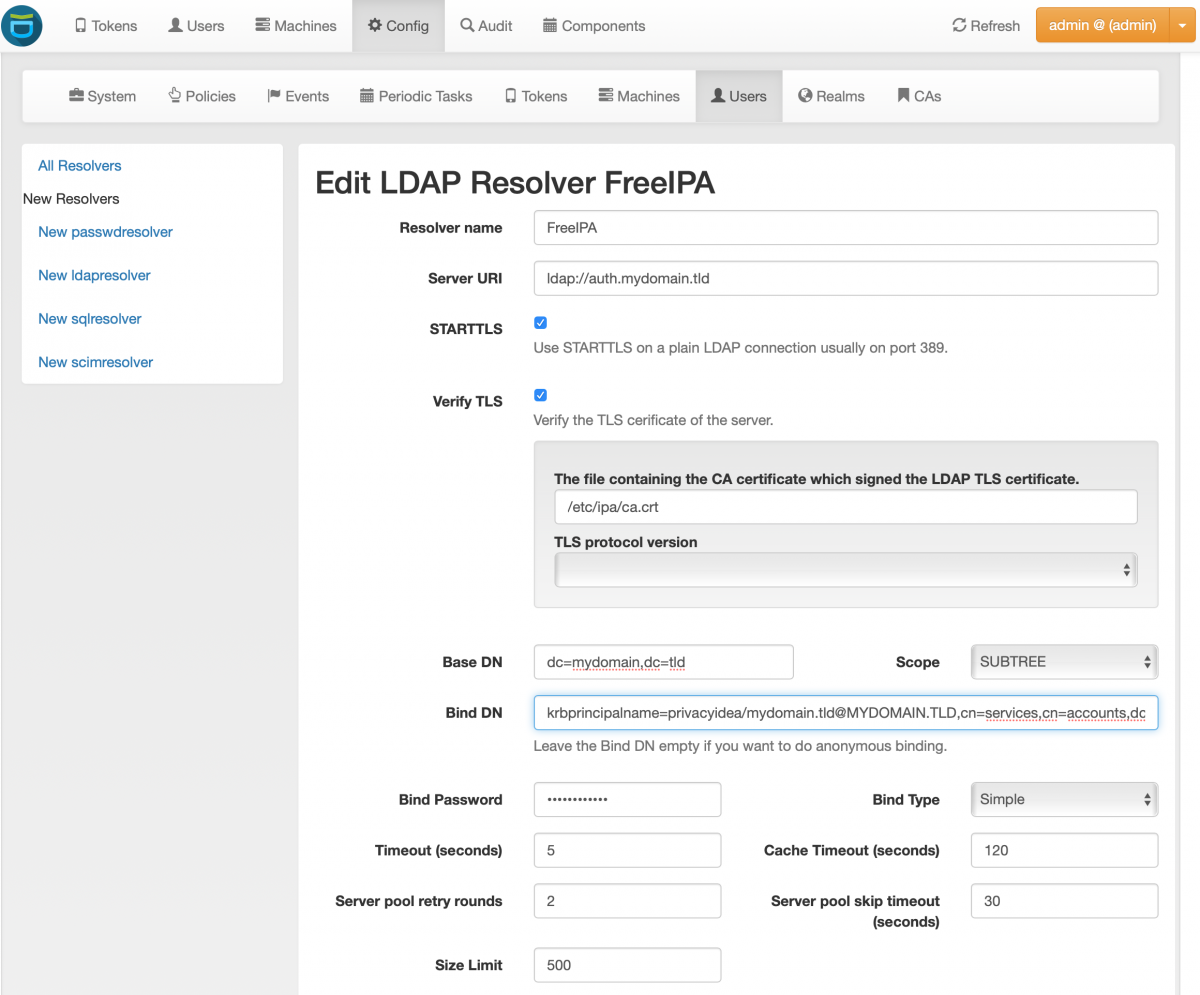
Log in as admin PrivacyIDEA, ignore the prompt to create a default Realm and go to Config –> Users and create a New ldapresolver with settings like below (copying the Bind DN and Bind Password from the script output and changing the other fields accordingly):
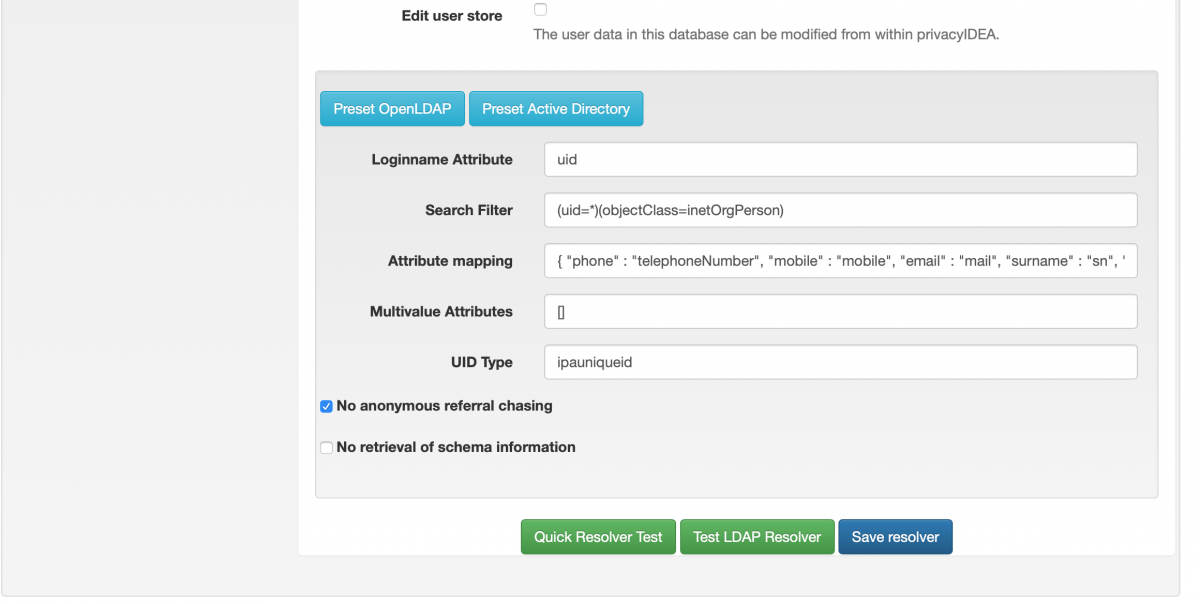
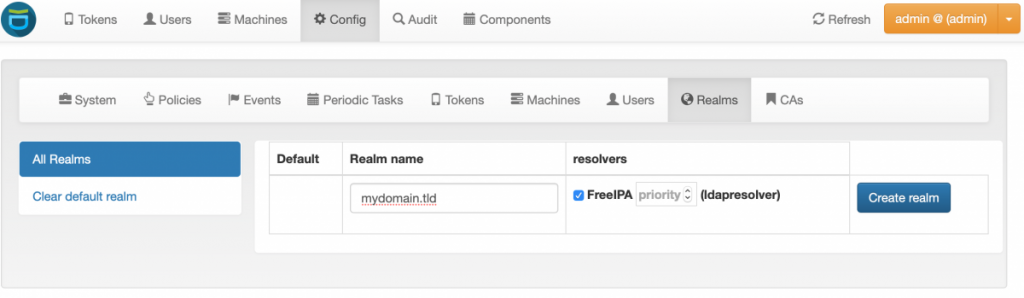
Both tests should succeed when all values are entered, save the resolver. next go to Config –> Realms and create a new resolver for your domain, select the FreeIPA resolver and click on Create Realm as per the screenshot below:
If you now move over to the Users section at the top you should see a list of users from FreeIPA. Users now can login using their FreeIPA credentials and create / enroll tokens for OTP authentication.
The next step is to integrate PrivacyIDEA with FreeRadius on FreeIPA, which I will cover in a next post.